MaruduinoでXBeeを使ってみる。主にRemote ATコマンドでIO出力。 [アプリケーション]
※スケッチを書き込む時はXBeeを外すか、接続を全て外してから行ってください。
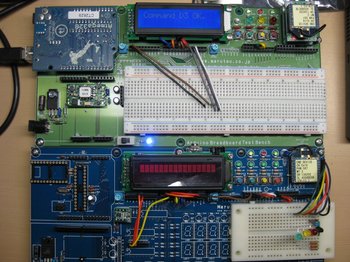
※写真の様に2個のXBeeの内、一つはADC0を温度センサーであるLM61CIZに接続しています。この時温度センサー側のMaruduino自体は単にXBeeに電源を供給しているのみで、特にプログラムが走ってはいません。あくまでも温度センサー側のXBeeはスタンドアローンで動かしています。
前回同様、いままでのページを参照の上、ご覧ください。
http://maruduino.blog.so-net.ne.jp/2011-01-05-1
http://maruduino.blog.so-net.ne.jp/2011-01-05
http://maruduino.blog.so-net.ne.jp/2011-01-04
前回はIO Samplingで温度データの取り込みを行いましたが、今度は逆にポート出力を行います。
使うのはRemote ATコマンドです。事前にターゲット(Remote側)のXBeeのDIO1、DIO2、DIO3を出力に設定しておきます。いや、今回の場合はしなくても大丈夫です。Remote ATコマンドで出力の状態を変化させるのは、実質的に毎回XBeeのコンフィギュレーションを行っている様なものですから。
事前の準備として、Remote側のMaruduinoのCN20端子のAD1~AD3にLEDを接続しておきます。
コントロール側のMaruduinoはSW2~SW4の状態を取り込みます。つまりこのSW2~SW4が押されていればRemote側のLEDが点灯、離されていれば消灯を行う実に簡単なアプリケーションとなっています。
")
※写真の様に2個のXBeeの内、一つはADC0を温度センサーであるLM61CIZに接続しています。この時温度センサー側のMaruduino自体は単にXBeeに電源を供給しているのみで、特にプログラムが走ってはいません。あくまでも温度センサー側のXBeeはスタンドアローンで動かしています。

前回同様、いままでのページを参照の上、ご覧ください。
http://maruduino.blog.so-net.ne.jp/2011-01-05-1
http://maruduino.blog.so-net.ne.jp/2011-01-05
http://maruduino.blog.so-net.ne.jp/2011-01-04
前回はIO Samplingで温度データの取り込みを行いましたが、今度は逆にポート出力を行います。
使うのはRemote ATコマンドです。事前にターゲット(Remote側)のXBeeのDIO1、DIO2、DIO3を出力に設定しておきます。いや、今回の場合はしなくても大丈夫です。Remote ATコマンドで出力の状態を変化させるのは、実質的に毎回XBeeのコンフィギュレーションを行っている様なものですから。
事前の準備として、Remote側のMaruduinoのCN20端子のAD1~AD3にLEDを接続しておきます。
コントロール側のMaruduinoはSW2~SW4の状態を取り込みます。つまりこのSW2~SW4が押されていればRemote側のLEDが点灯、離されていれば消灯を行う実に簡単なアプリケーションとなっています。
/*
  LiquidCrystal Library - Hello World

 Demonstrates the use a 16x2 LCD display.  The LiquidCrystal
 library works with all LCD displays that are compatible with the
 Hitachi HD44780 driver. There are many of them out there, and you
 can usually tell them by the 16-pin interface.

 This sketch prints "Hello World!" to the LCD
 and shows the time.

  The circuit:
 * LCD RS pin to digital DI2
 * LCD Enable pin to digital Di3
 * LCD D4 pin to digital DI4
 * LCD D5 pin to digital DI5
 * LCD D6 pin to digital DI6
 * LCD D7 pin to digital DI7
 * LCD R/W pin to ground
 * 10K resistor:
 * ends to +5V and ground
 * wiper to LCD VO pin (pin 3)

 Library originally added 18 Apr 2008
 by David A. Mellis
 library modified 5 Jul 2009
 by Limor Fried (http://www.ladyada.net)
 example added 9 Jul 2009
 by Tom Igoe
 modified 22 Nov 2010
 by Tom Igoe

 This example code is in the public domain.

 http://www.arduino.cc/en/Tutorial/LiquidCrystal
 */

/**
 * Copyright (c) 2009 Andrew Rapp. All rights reserved.
 *
 * This file is part of XBee-Arduino.
 *
 * XBee-Arduino is free software: you can redistribute it and/or modify
 * it under the terms of the GNU General Public License as published by
 * the Free Software Foundation, either version 3 of the License, or
 * (at your option) any later version.
 *
 * XBee-Arduino is distributed in the hope that it will be useful,
 * but WITHOUT ANY WARRANTY; without even the implied warranty of
 * MERCHANTABILITY or FITNESS FOR A PARTICULAR PURPOSE.  See the
 * GNU General Public License for more details.
 *
 * You should have received a copy of the GNU General Public License
 * along with XBee-Arduino.  If not, see <http://www.gnu.org/licenses/>.
 */


// include the library code:
#include <LiquidCrystal.h>
#include <XBee.h>
#include <stdlib.h>
#include <string.h>
/*************************************************************************/
/* defines                                                               */
/*************************************************************************/
#if 0
#define  DI13     2
#define  DI12     3
#define  DI11     4
#define  DI10     5
#define  DI9      6
#define  DI8      7
#define  DI7      8
#define  DI6      9
#define  DI5      10
#define  DI4      11
#define  DI3      12
#define  DI2      13
#define  DI1
#define  DI0
#else
#define  DI13     13
#define  DI12     12
#define  DI11     11
#define  DI10     10
#define  DI9      9
#define  DI8      8
#define  DI7      7
#define  DI6      6
#define  DI5      5
#define  DI4      4
#define  DI3      3
#define  DI2      2
#define  DI1      1
#define  DI0      0
#endif

#define  AN0      14
#define  AN1      15
#define  AN2      16
#define  AN3      17
#define  AN4      18
#define  AN5      19

// initialize the library with the numbers of the interface pins
LiquidCrystal lcd(DI2, DI3, DI4, DI5, DI6, DI7);
XBee xbee = XBee();

uint8_t d1Cmd[] = { 'D', '1' };
uint8_t d1Value[1];  /*0x04 is low, 0x05 is high*/
uint8_t d2Cmd[] = { 'D', '2' };
uint8_t d2Value[1];  /*0x04 is low, 0x05 is high*/
uint8_t d3Cmd[] = { 'D', '3' };
uint8_t d3Value[1];  /*0x04 is low, 0x05 is high*/

// DH + DL of your remote radio
XBeeAddress64 remoteAddress = XBeeAddress64(0x0013a200, 0x4008de66);
// Create a remote AT request command
RemoteAtCommandRequest remoteAtRequest
  = RemoteAtCommandRequest(remoteAddress, d1Cmd, d1Value, sizeof(d1Value));
// Create a Remote AT response object
RemoteAtCommandResponse remoteAtResponse = RemoteAtCommandResponse();

boolean an[3][3] =
{
  {false,false,false,},
  {false,false,false,},
  {false,false,false,},
};

void setup()
{
  lcd.begin(16, 2);
  lcd.print("Xbee Test!");
  xbee.begin(9600);
  pinMode( AN5, INPUT );
  pinMode( AN4, INPUT );
  pinMode( AN3, INPUT );

 // When powered on, XBee radios require a few seconds to start up
 // and join the network.
 // During this time, any packets sent to the radio are ignored.
 // Series 2 radios send a modem status packet on startup.

 // it took about 4 seconds for mine to return modem status.
 // In my experience, series 1 radios take a bit longer to associate.
 // Of course if the radio has been powered on for some time before the sketch runs,
 // you can safely remove this delay.
 // Or if you both commands are not successful, try increasing the delay.

 delay(5000);
}

void loop()
{
  an[0][0] = an[0][1];an[0][1] = an[0][2];
  an[0][2] = ( digitalRead( AN5 ) == HIGH ) ? true : false;

  an[1][0] = an[1][1];an[1][1] = an[1][2];
  an[1][2] = ( digitalRead( AN4 ) == HIGH ) ? true : false;

  an[2][0] = an[2][1];an[2][1] = an[2][2];
  an[2][2] = ( digitalRead( AN3 ) == HIGH ) ? true : false;

  remoteAtRequest.setCommand(d1Cmd);
  remoteAtRequest.setCommandValue(d1Value);
  remoteAtRequest.setCommandValueLength(sizeof(d1Value));
  if( an[0][0] == false && an[0][1] == false && an[0][2] == true )
  {
    d1Value[0] = 0x5;  /*0x04 is low, 0x05 is high*/
    sendRemoteAtCommand();
  }
  else if( an[0][0] == true && an[0][1] == true && an[0][2] == false )
  {
    d1Value[0] = 0x4;  /*0x04 is low, 0x05 is high*/
    sendRemoteAtCommand();
  }
  else {}

  remoteAtRequest.setCommand(d2Cmd);
  remoteAtRequest.setCommandValue(d2Value);
  remoteAtRequest.setCommandValueLength(sizeof(d2Value));
  if( an[1][0] == false && an[1][1] == false && an[1][2] == true )
  {
    d2Value[0] = 0x5;  /*0x04 is low, 0x05 is high*/
    sendRemoteAtCommand();
  }
  else if( an[1][0] == true && an[1][1] == true && an[1][2] == false )
  {
    d2Value[0] = 0x4;  /*0x04 is low, 0x05 is high*/
    sendRemoteAtCommand();
  }
  else {}

  remoteAtRequest.setCommand(d3Cmd);
  remoteAtRequest.setCommandValue(d3Value);
  remoteAtRequest.setCommandValueLength(sizeof(d3Value));
  if( an[2][0] == false && an[2][1] == false && an[2][2] == true )
  {
    d3Value[0] = 0x5;  /*0x04 is low, 0x05 is high*/
    sendRemoteAtCommand();
  }
  else if( an[2][0] == true && an[2][1] == true && an[2][2] == false )
  {
    d3Value[0] = 0x4;  /*0x04 is low, 0x05 is high*/
    sendRemoteAtCommand();
  }
  else {}

  delay(50);
}

void sendRemoteAtCommand()
{
  // send the command
  xbee.send(remoteAtRequest);

  // wait up to 5 seconds for the status response
  if (xbee.readPacket(5000))
  {
    // got a response!

    // should be an AT command response
    if (xbee.getResponse().getApiId() == REMOTE_AT_COMMAND_RESPONSE)
    {
      xbee.getResponse().getRemoteAtCommandResponse(remoteAtResponse);

      if (remoteAtResponse.isOk())
      {
        lcd.clear();
        lcd.print("Command ");
        lcd.print(remoteAtResponse.getCommand()[0]);
        lcd.print(remoteAtResponse.getCommand()[1]);
        lcd.print(" OK.");

        if(remoteAtResponse.getValueLength() > 0)
        {
          lcd.setCursor(0, 1);
          lcd.print("len:");
          lcd.print(remoteAtResponse.getValueLength(), DEC);
          lcd.print(" val:");

          for (int i = 0; i < remoteAtResponse.getValueLength(); i++)
          {
            lcd.print(remoteAtResponse.getValue()[i], HEX);
            lcd.print(" ");
          }
        }
      }
      else
      {
        lcd.clear();
        lcd.print("Command returned");
        lcd.setCursor(0, 1);
        lcd.print("ERROR CODE:");
        lcd.print(remoteAtResponse.getStatus(), HEX);
      }
    }
    else
    {
      lcd.clear();
      lcd.print("Error response");
      lcd.setCursor(0, 1);
      lcd.print("ID:");
      lcd.print(xbee.getResponse().getApiId(), HEX);
    }
  }
  else
  {
    // remote at command failed
    if (xbee.getResponse().isError())
    {
      lcd.clear();
      lcd.print("Remote AT Error");
      lcd.setCursor(0, 1);
      lcd.print("CODE:");
      lcd.print(xbee.getResponse().getErrorCode());
    }
    else
    {
      lcd.clear();
      lcd.print("No response");
      lcd.setCursor(0, 1);
      lcd.print(" from radio");
    }
  }
}
- 作者: 鄭 立
- 出版社/メーカー: リックテレコム
- 発売日: 2006/02
- メディア: 単行本
2011-01-05 23:54
nice!(0)
コメント(0)
トラックバック(0)


コメント 0